Smart Vaults is an interoperable smart wallet ecosystem for Bitcoin. It defines a specification (with implementations in Javascript and Rust) for managing partially signed bitcoin transactions (PSBTs) and miniscript spending policies over Nostr relays.
Smart Vaults is intentionally designed to work with limited backend infrastructure; the only requirements are a Bitcoin node and a Nostr relay. This makes it easy for sovereignty seekers to self-host their own and simplifies integration for developers.
One of the first steps to using Smart Vaults is creating a new signer key. This must be done on the mobile app or desktop GUI. The extended public key (xpub) of this signer is shared with Nostr contacts that you wish to collaborate with. Signers are encrypted and only shared with contacts you approve individually.
Signers are shared via the Nostr public key (npub), which can be done app-to-app via QR code or via copy/paste out of band. There is also an invite process that prompts a user to download the app, create a signer, and then share it with the inviter.
Now that signers have been share among a group, they can begin creating vaults using the signers.
Currently, the mobile app and desktop apps are the only supported signers. Our initial focus is optimizing for easy and fast hot wallet approvals for vaults. However, users can have multiple signers and we will support hardware wallets in the future.
When a new vault is created, an encryption group is created for the vault participants to share information that only they can view. This includes the vault configuration (spending policy), name, description, spending proposals, and utxo labels.
Proof of Reserve
Smart Vaults supports proof-of-reserve attestations on vaults. These proofs can be generated to cryptographically prove that the members of the vault have key access and ownership over the vault’s set of UTXOs.
Regular proof-of-reserve attestations are an important component of custodial hygiene, especially in multi-party or multi-institutional custody vaults.
Release 0.4
Key Agency
- Key agents are trusted parties that hold custody of one or more keys on a multisig vault. See our Key Agency FAQ
- Key agents can use Smart Vaults to register, configure, and share their signers (x-pubs) with users.
- Key agents can specify their price in USD or sats, in price per signature and/or an annual flat rate or basis points.
- Users discover key agents through the Key Agent catalog, and they collaboratively build vaults.
- Key agent fees are auto-calculated and pro-rated, facilitating processing of micro-transactions to pay key agent fees during low chain-fee time periods.
- Contact us via Telegram to become a verified key agent or try it out on the testnet.
Vault Collaboration
- Added vault invite and join flows, including non-participant ‘watchers’
- Ability to send encrypted chat messages among vault participants.
- Group chat messaging attached to spending proposals.
Usability Improvements
- Mobile push notifications (blinded/end-to-end encrypted) when a user shares a key, participates in a vault, and when a proposal is made, approved, or broadcast.
- UTXO Management: label receiving addresses and UTXOs, select UTXOs as inputs on transactions.
- Policy path selection: select the tap tree script path when building a transaction (enables more flexible and dynamic miniscript policies)
- Added ability to view vault balances in fiat (web)
Hardware Wallet Support
- Coldcard (EDGE firmware)
MiniTapscript template vaults for:
- Decaying Multisig
- Collaborative Custody
- Hold Lock
- Social Recovery
Decaying Multisig
Description
Decaying multisig is a custody technique where the number of keys required to move the funds decreases over time. For example, a 3 of 3 multisig may decay to only need 2 of the 3 keys after 1 year, and then to 1 of the 3 keys after 5 years.
One use case for this is mitigating against loss of funds due to key loss. If a key is lost, the owner only needs to wait until the next decay step to recover the funds. Another use case is for loosening consensus for co-managed assets. For example, a board of directors may generally require a higher threshold (67%) to spend funds, but decrease that over time (to 51%) to avoid allowing a subset of signers to deadlock the funds.
Vault Configuration Example
All 3 signers are needed to spend. After 10,000 blocks, the after block meets one of the threshold's conditions, so only 2 signatures are needed to unlock the funds. Finally, after 20,000 blocks, 2 conditions are met by the after statements and only 1 additional signature is needed.
Inputs
- Threshold
- List of Signers (extended descriptor)
- List of Lock times (integers)
Miniscript
thresh(
    <threshold>,
    pk(Key1),
    pk(Key2),
    pk(Key3),
    ...
    after(Timelock1),
    after(Timelock2),
    ...
)
Output Descriptor
tr(InternalKey,thresh(3,pk(Key1),s:pk(Key2),s:pk(Key3),snl:after(Timelock1),snl:after(Timelock2)))
Example
Example Output Descriptor
tr(3ec243044db203bc418092014b46bfe9494a1c16ee66160e385d7dd676e378cd,thresh(3,pk([7356e457/86'/1'/784923']tpubDCvLwbJPseNux9EtPbrbA2tgDayzptK4HNkky14Cw6msjHuqyZCE88miedZD86TZUb29Rof3sgtREU4wtzofte7QDSWDiw8ZU6ZYHmAxY9d/0/*),s:pk([4eb5d5a1/86'/1'/784923']tpubDCLskGdzStPPo1auRQygJUfbmLMwujWr7fmekdUMD7gqSpwEcRso4CfiP5GkRqfXFYkfqTujyvuehb7inymMhBJFdbJqFyHsHVRuwLKCSe9/0/*),s:pk([f3ab64d8/86'/1'/784923']tpubDCh4uyVDVretfgTNkazUarV9ESTh7DJy8yvMSuWn5PQFbTDEsJwHGSBvTrNF92kw3x5ZLFXw91gN5LYtuSCbr1Vo6mzQmD49sF2vGpReZp2/0/*),snl:after(1721743844),snl:after(1747663844)))#p0skyz4j
Collaborative Custody Template
Description
Collaborative custody allows users to configure the number of co-signers and the threshold required to access the vault’s bitcoin.
Users can choose a 2 of 3, 3 of 5, or a custom configuration, this feature ensures that multiple trusted parties agree before a transaction takes place. It's an ideal solution for shared ownership and collaborative arrangements.
Vault Configuration Example
To authorize a transaction, any combination of 2 out of the 3 keys (Thomas, Lee, or My Signer) is required. In other words, you can use any pair of these keys to successfully spend the funds.
Inputs
- Threshold
- List of Signers (extended descriptor)
Miniscript
thresh(
    <threshold>,
    pk(key_1),
    pk(key_2),
    pk(key_3),
    ...
)
Output Descriptor
tr(InternalKey,thresh(3,pk(K1),s:pk(K2),s:pk(K3)))
Example
Example Output Descriptor
tr(885db1e89516e0f0adc15ff8389320a01270a54f3b8ea4ecc705472904fc9a7e,multi_a(2,[7356e457/86'/1'/784923']tpubDCvLwbJPseNux9EtPbrbA2tgDayzptK4HNkky14Cw6msjHuqyZCE88miedZD86TZUb29Rof3sgtREU4wtzofte7QDSWDiw8ZU6ZYHmAxY9d/0/*,[4eb5d5a1/86'/1'/784923']tpubDCLskGdzStPPo1auRQygJUfbmLMwujWr7fmekdUMD7gqSpwEcRso4CfiP5GkRqfXFYkfqTujyvuehb7inymMhBJFdbJqFyHsHVRuwLKCSe9/0/*))#g52crz77
Hold Template
Description
Hodl time locks let’s user set specific time intervals, with a maximum of 24 months, during which their bitcoin remains locked.
The hodl time lock feature prevents impulsive selling during market fluctuations and allows users to stick to their investment strategy.
Vault Configuration Example
To spend the funds, the second condition must be met, which involves an absolute timelock represented by 1701559661 in the example.
This timelock will be satisfied after the specified time [1 month] has passed since the creation of this transaction.
Inputs
- Signer key (extended descriptor)
- Timestamp or Block Height if using an absolute timelock (
after), number of confirmed blocks if using relative timelock (older)
Miniscript
and(pk(Key1),after(TimestampOrBlockHeight))
Output Descriptor
tr(InternalKey,and_v(v:pk(Key1),after(TimestampOrBlockHeight)))
Example
Example Output Descriptor
tr(e3e5c4a66d85841b9cea26793ef640bf7c1d26e759ae0296e643a16dad606c02,and_v(v:pk([7356e457/86'/1'/784923']tpubDCvLwbJPseNux9EtPbrbA2tgDayzptK4HNkky14Cw6msjHuqyZCE88miedZD86TZUb29Rof3sgtREU4wtzofte7QDSWDiw8ZU6ZYHmAxY9d/0/*),older(10000)))#e4gyn573
Social Recovery Template / Inheritance
Description
Social recovery keeps you in full and exclusive control of your bitcoin while enabling a recovery path in case you lose your keys. After a predefined number of months set by the user, an m of n multisig of trusted co-signers is able to move the user funds
Between 20%-25% of all bitcoin has been lost forever by owners who lost their keys. This security feature helps you have a plan B, leveraging trusted connections like friends, family, or colleagues to regain access to your Bitcoin
Vault Configuration Example
To initiate the spending of funds via social recovery in the multisig setup, it can be accomplished either by your designated signer or by following the social recovery path. However, this is only possible once the specified timelock duration has elapsed, and it requires the authorization of at least one out of your two designated signers for recovery. [either Thomas or Lee]
Inputs
- Signer keys (extended descriptor): 1 + N for recovery
- Timestamp or block height if using an absolute timelock (
after), number of confirmed blocks if using relative timelock (older)
Miniscript
or(1@pk(Key1),1@and(thresh(2,pk(RecoveryKey1),pk(RecoveryKey2)),after(TimestampOrBlockHeight)))
Output Descriptor
tr(Key1,and_v(v:multi_a(2,RecoveryKey1,RecoveryKey2),after(TimestampOrBlockHeight)))
Example
Example Output Descriptor
tr([7356e457/86'/1'/784923']tpubDCvLwbJPseNux9EtPbrbA2tgDayzptK4HNkky14Cw6msjHuqyZCE88miedZD86TZUb29Rof3sgtREU4wtzofte7QDSWDiw8ZU6ZYHmAxY9d/0/*,and_v(v:multi_a(2,[4eb5d5a1/86'/1'/784923']tpubDCLskGdzStPPo1auRQygJUfbmLMwujWr7fmekdUMD7gqSpwEcRso4CfiP5GkRqfXFYkfqTujyvuehb7inymMhBJFdbJqFyHsHVRuwLKCSe9/0/*,[f3ab64d8/86'/1'/784923']tpubDCh4uyVDVretfgTNkazUarV9ESTh7DJy8yvMSuWn5PQFbTDEsJwHGSBvTrNF92kw3x5ZLFXw91gN5LYtuSCbr1Vo6mzQmD49sF2vGpReZp2/0/*),after(840000)))
Kinds
In the current protocol (v1) all objects (shared keys, vaults, proposals, ...) are encrypted using NIP04.
9288 - Shared Key
This kind it's used to share shared keys between participants of a vault.
It's used to encrypt and decrypt everything related to a vault.
Required tags
e: event ID of thevaultp: public key of the user able to decrypt the content of this event
Example
{
    "content":"PDj1bNB1PuWKzPc1RrKBmbEeXDaYkxRIsAqTraJscUq4ML3+mZzJq4O6vPkkIJeZuNQTp0EyLxAvUblXCgJxaEgwxRWQC+rpdz3ILjdQA2w=?iv=B5KnzXU7smmAWevhTi1rSg==",
    "created_at":1693903672,
    "id":"6bc1eb162aa5d0623370d808578d15a77e1e91a55ee93255ec070d5e03b4c87f",
    "kind":9288,
    "pubkey":"f831caf722214748c72db4829986bd0cbb2bb8b3aeade1c959624a52a9629046",
    "sig":"ad9bc22082b5b5d23b75bb3752109b1d6d97a7ff29f1effdc710943c69f7550479856c06e76e4361e033be7400a27a9e688b3a4cf417840b7dd2b0df1403ec39",
    "tags":[
        ["e","071dd01141b000f7d0c9f8172101e8efb5771939456d8e4a3f8b37f6d458e82d"], // Policy ID
        ["p","f831caf722214748c72db4829986bd0cbb2bb8b3aeade1c959624a52a9629046"]
    ]
}
9289 - Vault
Required tags
p: public keys of the users involved in thevault
Example
Unencrypted content:
{
    "description":"Vault description",
    "descriptor":"tr(...)",
    "name":"Vault name"
}
Event:
{
    "content":"uTK3M5F958K1HKEJf/8ciVNLVw0u6dwkSANxWGBkZvpM3/3kIR/miLUPGuYLskl8ttBcLRXU07fq1mhC0+PsppJo5PQ3XyWFGWGWOQXktOKPIhpQcbpX6xCZACKN9BP6x1kCt8RCJB8nwqx0mD21syZRoQdOqKXWR/1r4rqknMS4uPY3nwT15vkP0p6zP6ZD4m9ykBhiRhGiUYxdakMcKcfHt1R22OF0trCt1+KpL9cdVqHpiiJy9hofgKb7wqPFnwcoRVlariXoQIIOoZHzOS69rzmqLFAyz6PWl2ifSwhDX9VCMw6vzp8Trp0lO/txhGW6+mIn9DBebj0cJQCygUaUmpzyBXOAzuzndUDPHMsls12qeOfX64edLgGyC/jL7qG9HS6Z1Wo91jlpqwTmqY3yzMGGcMZ01VkJ0jmbB8OuuO/BfrU3YMLQMAXMyc8BVyyksNIrG9tEMJlGDe4w1Wl2Ss7jiZRqLzuJua7w0RpApAmQ8zAsaDojVOEES87/pG+Pl6EyQxnofMMmdi1A+LSBQBAjtglGdKaK740I6Cjc2acBwqohiM8CV+tbTCqn?iv=fPuKqXaCoczpZ/3eikrTbQ==",
    "created_at":1686479425,
    "id":"9e0dfd2177ea9357f0c165ed134a86a3c07449676d8315e12d159932ff428e37",
    "kind":9289,
    "pubkey":"4639e297633117888df17deed6b3860ff152e9e464690623b6b3d6ae4923ad62",
    "sig":"2ff3f48a7e80db25418df983c732edbc495b0fb28f4fdf051955867c0e180131f7f7e9499957adee76bc9fdedc5fb7c8a71ec7e1655322e39cf5d4f590bfcd15",
    "tags":[
        ["p","3eea9e831fefdaa8df35187a204d82edb589a36b170955ac5ca6b88340befaa0"],
        ["p","f831caf722214748c72db4829986bd0cbb2bb8b3aeade1c959624a52a9629046"]
    ]
}
9090 - Proposal
Required tags
e: event ID of thevaultp: public keys of the users involved in thevault
Example
Unencrypted content:
{
    "Spending": {
        "amount":1928,
        "description":"Proposal description",
        "descriptor":"policy-descriptor",
        "psbt":"base64-psbt",
        "to_address":"mohjSavDdQYHRYXcS3uS6ttaHP8amyvX78"
    }
}
Event:
{
    "content":"ShT2G9QmydYwcYEfqdXQvLYKSP4Gi4AfxL0XrtuO9C6y64wp+nHYQQ0IOZdA7YTtkfQ8n5c8/ZLJkjl3oJosVGbmrT/7H98Q+wM3IwFBKlOTdzq8g6Cdjx6lMfmm+wfysLu3X+ZN6xO6vK+cXCZpNeShChnC52uaVfd4afNG9qUsdGGPueQoX/TpmjHLRd/v4HfOf+aAGJalNNpHxugK4XR/Tb5zCMrLkMT/JOdz4jIFV71FZunyCvT/Iafz4aN1hUhFJjG/ERueSsOdRJpdkI/15M4rOMBgWm4/kW6MKGgTRFO5yLin0C4oqHmDb3urPTDirTk2ENDgZ0nhj6GcpjDNg92508fUkdjTcu6Td4stK3VLsSAhyf/KECXC87mvn5F8r0SkJGUHDbgtG7yFd8RMg5gJ77+wP4NdpFIuJ8Yiziz3KWY6Q1dSMpsPrgvLtCuRsyaR6rxISt47ELrUY/U0vruz26LCAILF0G7MyAEkeK6bgHZPWow07jCBJ7V9bBPrCCDsGpzekLO/cqrsSV8qGK1hvwCZ51CCf6OFdWoRagsTO/uqxts+CddGhFbQZQB3LiSU4Pd/Vm1RoajAm7YEWU+DT+eGPMvavWGIAFrYzrXZi8LL49YI2K4+0hvhgoQKUI7YiFM7ZhfohA0Utrv+JDjD7jIQjgVM7HpZoP5p4OOOd/YeMl3XqsaVnSUZDfj8Vs8bXgu7TnhibkUEhR8NqxuA5f8EmWjlwMuxwQP7HoIfhSIpyki6JnPPt7vKhVn8hBOFbhbbrRO2cw2jFezHmcbGcQV4R+QCmaRK43iWgbG3Yu3uZ8qZnjeLfl/BJHf61gruzC8CYphTSBUIjlA16IjcH24B9TO02b76EIBDsNoOAB3KKeb7t0glIAS4XG1fXX4WgJdEwp8ehCttUyo55FYDT8+jeO2REYxc401JtsPAF9e6Y9Xk/xYkOvjziFXz+n/9ygH4j5LW0PPsWMybSttYsm1X+O2icHiWrNnKufCACMJMStGC2TnUQkVWZMQE8n+UEsrWopKEzkKwsF0CmbhQ2nPfN7xZm1Z2mKNMvG/J53Ig3x5TlOKRTcd7aksX2F+d24pkr78DdaExnUixY7DR3YVBqitiXcRr+nJdtu5OqkVpqejk3jU6EDBbL2PE+A3/qAfuMGZ+DhAQaHw+lDBveFY0DpmcI1N7+84vaj4vCtXonVnZ5Tz1xHyn3I+J+Ud7UWctRUD86JLeCVlZEzqOQwrhZ+G9JctnPVlBs2D2JSwjtAkg4kXcgHOq7+d5zGdPk3uW4xABj4nuDZ3SqxhwaGbz2+8uzKMBoq6vNx8bIl/oDKSZl43rXfr91BdeAgneXUfTaqlAwdNpXqVHAduZTQpkeX7jS84IrzJ7yT2wIehC6tEXqZVEhpZzO3AhU7dacEv4JdN/k3rRNbXAwQhoeTs+25DXjXkhnvV5OD6LNMDm6EtH+eeGZPvx6YlvADi2XAXh/1QQJVkNof+miH5wmIAtwI1PnKFu49mXAvDSsC6a8xgKZCdeu+VuhoDL4WGxo+DoPTAYL4cuk004MXmIrxjTLF22gzPPmuUCCpYbJZplXY3Ax/f6LY69RfVPeyxZIPOOGQWPHPDW8lYgoXlBMHaYdMkUqiSAJ2rml46HjTLz38l+eMq5yNCNlZnHuk/s7eaRpTVdKQ6IW6gPgCeNNGxvoEAhL4ZtdM3PRKXbZYvM9CEZ7IUT8Izg84kCayvh3AqFfR/2htl8EK4jpP3JEwak8I2j87vTH8bmjXqJxJV0gClwdn01bqWmZ1Z6xIkBTFrThyrOPrrmKqlllN1uoCOODufUv6DaEbg7iy7v7iTSq5k7MGAyPRYJt4qlX3yuI3s1p/7XuO45YqPiweZNnDDDghesWncYuTEK2wOND0QUpI2lgtSKHYPx0akNjjRE8hcQ89iAWZl+XQwNsEIKJkT3ZlJpMUG2VjYRRkmHRmN/Wkq+7geYz4bm07P2lCu8Pcge5qR3SLcorE7ykmzvFGo3JnE3vmFzcMtxBFq0hReY2wlsyECCzLQogCSVc7xw4jjNZCoFIw1G4gGxg18ed6uP1jUdqvVtF7pON18SusTjXJ7ggZaFmfQwFb7PcrpnWfJnrDexA22rBsja3RmJLJcms43Aozs6sksrYlU7ObCebP3KBFV5gGFbXR4T+rDmNlFDf6lC3rgD2OvMIGvT4f2fS3QaG2ZUCMFObNv2wwK8nKouoTQ+zEWKVyVflapsTKQ7vPMC4yO+C76aafbrzYvbtYWYCsL4uHnuNgUDg+rHHNqe51fIUhQOwdgWJ7+kmjHJO0U1UiD/xKjfqnixR1S8mx7zoMD+521hk+SVR33f3+K5CtFGITSBjJnLTugb1IL8wSkImwivj8gdgj5XZ9Gc4WKpiB/rNOQjPPmVTae+EKT1Sii5/kA5cXyPXq30igkFFwhyovzmqXt7l9szBW4U8Sj64lgfen7DCN2JBU1XCSXMeP9g5B/sv/lLKEOnFQLDJGH76U9M01hi/8ZFflgsxRE2ZgBECz3ehnCePKxNup692sR3Bog6w0Pz+4QjJRrEYrZmXoLLEX5dk9qc36NxxJm1Jo+BWvUerVcS0S8jkyh1kep5MVhBF3ey1nxwoBxnz5EtWsZhnf3An6D/ZvfaydXwFvJ1a77Hnh+YwtDC6r9yIyrmqHfvikg8fO1Rq/KLR0oI/vjEg5aldJVO2+gRBHsdgzXaX/2p9bz8ZIPDs4/8C2ShuwJc5HDj8hiro5yscpuQNnPSo1apWUdGt/P0u2AnhPXjid57gLYynDs50k7fzxXJvBDU2b4CS91NMuXWg6nIXI4XwQ+x94ZNOQGXInf1aFO4Vt6vA+8Bb6I716vkQKHFZIacqJpuddRQfqQafeXfzeUWtcReolxdsDr58rVlAiWqjILwAZJlaGpZneg9S9hz7Nl/pq1a7FcFGOhUm4/fHHm/efHENmi+JlHj9D8desRwenOda1BkjMjumSovLjltNrq+177z4iiROXqW//ViefV9eXHX0s7YQM3NOOldErYCP6gs1VQrvZPth9vwbjtuLBKEvMGqvSzrNxdTSuWopr9gPpz00mtaR508entx6l0DdK/WpduztyFvZLRm0d92egk7L0Mr2phmIB4kmDyh9VibdA5bGzKRCQJsIWaCTVs17Qw=?iv=whier1QoEXYwFJhwcpcl3A==",
    "created_at":1694781913,
    "id":"726e919e26dcc70dbc3926660afa589793233ca6c94e69f9687fd03c02f74263",
    "kind":9290,
    "pubkey":"4639e297633117888df17deed6b3860ff152e9e464690623b6b3d6ae4923ad62",
    "sig":"5c88ff5bf65fe8da798bfd8303f493040055748d6c06d623b26393d78631edc0dadd79a4cd6f10930feb43d23900390c7dabbf5287c4a32b8c0970a6a3e9d0c1",
    "tags":[
        ["p","3eea9e831fefdaa8df35187a204d82edb589a36b170955ac5ca6b88340befaa0"],
        ["p","f831caf722214748c72db4829986bd0cbb2bb8b3aeade1c959624a52a9629046"],
        ["e","9e0dfd2177ea9357f0c165ed134a86a3c07449676d8315e12d159932ff428e37"] // Policy ID
    ]
}
9091 - Approval
Required tags
e: event ID of thevaultand theproposalp: public keys of the users involved in thevault
Optional tags
expiration: UNIX timestamp of the expiration of the approval
Example
Unencrypted content:
{
    "Spending":{
        "psbt":"base64-psbt"
    }
}
Event:
{
    "content":"xTv+0Vw4fzB3Kt5x6LK9rjnbIG7sL7J1J+nvoA1OmBw4ERa/8xvqQKv4DWkjDpy58cHYrtidnIcYeNsG0ATQ1p5VSlpqb4bw4RS2OpMT7MbTqS5jSTqpOTSSeu2zDc2yF0+VE3GgDydrt5ck5Hx8rdkPkAJ+rLJ4tcAUBo53gMzTBJ/wGMFTTsVK9w6nSq43ERfow3fzoxwUIru9gBbOFoYg+svqPByL/GvIuvjTPPHGzimQxdTqkkmAy+pjSTYE/UJ4rVbmuerdoQAH87cYwWmpcPaF0hbsvV2071DhMJjHFASN0L/1zjRYZheddDZNT9ePyv6tHQ4RczJF4apR8lyUEJp6wECU6/xFy5dXMn0a6VDrPFJ8s9A3dSD+6CkCI1o3wIBlixPDQUDtNN69h1ZMJhDbiirFXsAYy9nkA5LGDYhUw9mdB8NG5friFxthZW1cwWYm/uudUAreOJBtUaNqNLhwfxvgnDjDjUrgOnT+DxRllsnLoshuv0IXwcYp5dYtiD/e30lEefdeZ4CrIfQdZkndpIBfcwBJG0RUNgfOdkVgurhhxuKFp3/oHaW8X+EnIW6EQRR0ut4PQJFglQtjGJjUlZ5yb/IBGvGnVfgGXLThN0hiA5QP78CBWinkEbPL/Z0mOI6bLkVW4Zo+xt4Pntxh2k4PSO5SizuZz7EWkmTt9Jxq+597T7Io6t6m6Kx7ryURN1OPwSGEXdxyRkIOcwxOsD2RILvwxF5h/Mt/Z/oyJ0ylUTTyxkkAbzluhtjlLyC1lzmE6L0U4P9/iK/7TMequnT24Rtt44HggpYP7d9a9dasvCDiZLUvxLGnjKN7RAoxQb1j9zELOl0LKem84/e5vIIeobYaH000FYiup1imxPZJ+Ufd/K6Coxf7YQY7TCqP79xLGteM2saium8WP3IH9yd4R/g7fxFVTt37S/Ys67HHNgmDx6fzb5NOgwTs/Iz8IO4LMiXVZAoJJ5cC+6lwbgNuuSvQ50g67NdY+NLWyVofFY3TJkkx/bXeracUlJrxKJG4jYQhm41z4/UKCFnAf5uq+6aDoWUpyNu2QB4Z+6glYH5IyJz2XgbZBz1zjWb4BCc/tT17J9UCn/B1OIKLFnHl+2tLR0T8/ZN6cwRlA/o3S9vTmNbu5QtvEqXxlE+r9OasCwPXrmV2QdYw8I/h1XzbDFPK54UGJVxy1P3CM0oGtnCibaZdFyslAr/R+l79NHw64ApuEhP7ZNHTFxB2yLfMAcAYf6fuqw0YxJiV78ui1fSue4IUV6+wlPFKBfz/RqTG0zkmZId8NPiPXUCzy7wMvZwcTZFEhZOUijlxLBWMwr3tXYzJHUbWfzHrhwued68SWw0AinUeP3mkREju0uo7ja6pKKFtAhP+VzO9ZqqTA+VDAIlNmvFw4aela8MLbgNCpVDNI3wxj3fb0PpWjmETG1DrDPpkYlpBBBRemFOOhhwcLx4kjNqKr4db1cYN/A5wWe6QXOTPs9EeyrWQXGOIxNgQA0+VJJeynmXGxZ2Vsb+mhj/X7XHyVKOl4yAvx9xqe+kMsDg7Ww9bT2jiIJ0kqOjxZmusa3v/naV7rGjKRbkBE7U4xdsgfb+Z7wIBo0qkSQyMYqDt2L26Nj77pQkCjvitpm0WULl5hTJMCnTxtE8io/C3TsVQ1PaKWYNAJi9W/OcOmgPH1gq+EKmgrgi1sfUk2KXEVALQWncbSZtBAqMLtsH3R0+I//03VbeMFFvWXi7yDfVBE5iCUPcVpPFYSsrTdCHu6f5QMTukIn2xplKsAK6tk7hMfZ+3u9yzlC3M1GCe7PSm+tLlYSOxkB1smmWn/ZLF1dYuoAyGbwGG+wL2J+GpjOO0u5LqZpO202CVhT9hZ178HjvDMYVqR7SIfnVR4mAIkvfvnoMYTJBEKjT9fKJNJCgi?iv=3uD9CK7zc9OTGN8VGyKqtw==",
    "created_at":1694703253,
    "id":"728e7aa746d4c207f118576d41908e92788616b86ae9108d3249fced0023168b",
    "kind":9291,
    "pubkey":"f831caf722214748c72db4829986bd0cbb2bb8b3aeade1c959624a52a9629046",
    "sig":"7d6219e097559ad0b3ac8a5e7529a4f709cf0701d2003cc8ecacb829a3db723c819a0254b012faaddfd67ce690a7437c8cec01c90f94cf76472919e8a31a85ba",
    "tags":[
        ["p","3eea9e831fefdaa8df35187a204d82edb589a36b170955ac5ca6b88340befaa0"],
        ["p","f831caf722214748c72db4829986bd0cbb2bb8b3aeade1c959624a52a9629046"],
        ["e","e64282e3491ebf5de5ca499bd211d5a26d1636d3197f7341d6eef804ed0a61b0"], // Proposal ID
        ["e","9e0dfd2177ea9357f0c165ed134a86a3c07449676d8315e12d159932ff428e37"], // Policy ID
        ["expiration","1695308053"]
    ]
}
9092 - Completed proposal
Required tags
e: event ID of thevaultand theproposalp: public keys of the users involved in thevault
Example
Unencrypted content:
{
    "Spending":{
        "description":"Proposal description",
        "tx":{
            "input":[
                {
                    "previous_output":"57bd3e5dce42855346698ed6afc5acb65746abfda56e93db11ffa8be3677f612:1",
                    "script_sig":"",
                    "sequence":4294967293,
                    "witness":[
                        "6cb594a167ba0266f8e7a0d774089da0d6b0213f9838667edf3c65bfa232c2c0b2c11f71902d17343faea56ac1f48299b35095f6d8967b6881d0741029e18216",
                        "e0b5eacc5044729bfbc79bbc3ca79f3f9c355400334d4a9b5890353d3f9027f8cc91233f677bf049e75d7ba3ae3499186c61f5b7521460f28119e078222d63a1",
                        "209125b5661a3388ab58218ef1f7fa6530fcc1fc450fd2bc2465f020037655bc5fac206cdbe7b03576c53da1deccd58f0605406d270df70bf925bafc9553672148e997ba529c",
                        "c00202020202020202020202020202020202020202020202020202020202020202"
                    ]
                }
            ],
            "lock_time":2502480,
            "output":[
                {
                    "script_pubkey":"76a91459cada50314c829e19f5a7786f8ee0d4987f429d88ac",
                    "value":1896
                },
                {
                    "script_pubkey":"5120045a52300c0628547fd851543dc9a0fc653b75bd7136d326a736a649251838f7",
                    "value":5594
                }
            ],
            "version":1
        }
    }
}
Event:
{
    "content":"vMg2YFd3xXhNbLt+IK81FoBfvztBSLjEEiXzeTrYDrhOGmjhmNorLCl8JsRdjjMl1mULdX6UGmu1bQq3EY2v/HNLiiHfb/TU1LhD+XOXvRBUCQToEguarQcknVqVSry7GzIH+J0z6aT/DbYzMpWeA3g6q3HMBs6sj5QfBb6DokUKbFadq74CDnHoEgQ9qhcJaL3qZXL5g01J47u1ceHW+G6/iTEH+TFBKw4iQhdzFH+GyMugow3EmSvuPiiVFr+ZI6iAo14DqqjKKC41XW5wnFeZ2TZTbTHDqnTQrguvfULCpP7p7yOFKlnTUzd0Mgw41xB7FUFCkAmIpZaMNQErCIp0/PTtBZheUM9GHFvuJO3gmZ2B4b4HlbFEpNQ5S8+aYxIOaawLYKbdV7CNjE/hwB2ZQbDLB/UcQ8mbYzkEh6z2bARTCKoiqpNhIyj+OjZbkYjFm/J0ZDAOc8kSyuSqOXGyrtbL669ZBSRXxDkagBmX2lFJ3FZmDsWUbWDtY6IZsCIZDwncVH/P+hU1zUAh+vvdHtt4TSJ+4Iclg1sv9c/Rd/esgjlh4SMav/HBsjkGeaiifRP+rDq5JYRJZi+7xkna9vak1ClBBJL6NUpx87a3h3D95XcRBQQidJhCAMk0Smil5IOB7iz1H71SsJ88+mVNvw0S6Nxy2qfA3FU9j4Kz7X5+F74dHy4UHbn9GCCjNNCQXyZ8S1A/WtQQCv89Gnv99QcX6wkZtVpJ8dLsGUBzZ78xYkfjagzfj2idAxrlCTWmn7fdkc4ZWEzr6JE7GOnLyrjerfVZzecp5kuTM+7j170rLGgnOpt68MSTC7q68M3AwLW9/0s5iC5tMmZJuLnUvMg6A2ZSLr3IaDIazOgH3EbK3RsZ4AUwTRwiCYwu7LQTsiRMvAIG0wrfe3Ldb9G9qHyo5KgNr1CAb7upip0/HL04aNJISn5qEO/cCNM0nW2S41h+Xr9p6NDngnNPnLXC/r+Y1wSEt2bHuemlzC+BUZxsFG300bEpQMsiYJQFmj2JezmLkwLZSEhIPM7KsZ9HbjfowhAe1wF/hZ1iRDzCjknBu1LZcdQhe5Ptu6T2?iv=C4jXF0j5ldeCO6hv9Zajlg==",
    "created_at":1694705897,
    "id":"9a0cce3a14184cbd575ea8ef5f61caa1da830320ab8222902eeaf701bd20677a",
    "kind":9292,
    "pubkey":"4639e297633117888df17deed6b3860ff152e9e464690623b6b3d6ae4923ad62",
    "sig":"2fb7a6c956b66c3c189e2e9775483270ab95a82a7578d75390ce3e50a4d7b223cbce31402277c48d9f4565a02fbd933e676474eed81d69e32dce94d175406023",
    "tags":[
        ["p","3eea9e831fefdaa8df35187a204d82edb589a36b170955ac5ca6b88340befaa0"],
        ["p","f831caf722214748c72db4829986bd0cbb2bb8b3aeade1c959624a52a9629046"],
        ["e","e534d73109b98a8a2f2627634ab1d0195923dd638b6aa76a63eb7eefa3d59e32"], // Proposal ID
        ["e","9e0dfd2177ea9357f0c165ed134a86a3c07449676d8315e12d159932ff428e37"] // Policy ID
    ]
}
9094 - Signer
Example
Unencrypted content:
{
    "description":null,
    "descriptor":"descriptor",
    "fingerprint":"417a110f",
    "name":"Signer name",
    "t":"AirGap"
}
Event:
{
    "content":"bVTA0YYf0+8CZXZtnBWMFu5YLyJR75YyRgAuiATQIvc2LEqiB9B5ARhypbtP+pGRXrhHGaPeZCzSunsP/sb5MXuXmsofAlzWeEAUcAaZC59z2hC97d2DSwYCQFE89MQTf9wrCPZGGAyfEMG9cnSeBuxldKKL5xOPCLfv4JqRSqdILI08h6leaxKTjZLJOLA+Pno7BZlsHazBuV7ZKwq6uGtsF3Nx2v3be+/210JnIrUFyOmCTqatkaLEHLHzekfTV86lJZTQ7YH7XE+TeQpen4H2ZlaJoeEB/JbR8PuONlVo1tjbWq8gdV0G/7kDs57LIzHW6pPsmyh1CNkokfp1Uw==?iv=UUAnvlWtfnHbj5bqDZomhA==",
    "created_at":1688205807,
    "id":"fe1b6712daabae7157b4948d74c53a01f6186c4ecf0619ea147de85fbed8735a",
    "kind":9294,
    "pubkey":"f831caf722214748c72db4829986bd0cbb2bb8b3aeade1c959624a52a9629046",
    "sig":"65783a7e0e1cff481cfc861413a2485ce3e9c461887c51e6258d9e00023a8c34058239f55f2156e88c6052e3df252bdfbc5bd132ebe6773968621ece5517af41",
    "tags":[]
}
9095 - Shared signer
Required tags
e: event ID of thesignerp: public key of the user to you are sharing signer to
Example
Unencrypted content:
{
    "descriptor":"tr(...)",
    "fingerprint":"00000000"
}
Event:
{
    "content":"LC3wv4bucBHIIQkvR9iNlQbSHlEIRqRnfPM0cDwxYr8NRL57Jq1K6kmUbGPXrviDgYlUiNxxeRYNKqd2OX4vhjojUuUQpSr7B01zSS1nCi7JlJU1BdlNcvwZSN/Qd6cW+fXfBTLebdBVRDAR9N681i0rf1kaRI5v3kcTK/Kgq8YFDun0C85nRjyt1GsfcrH297w9nF1+uG3MXtTXAbh3sDPuEWLFR8MS8OEdjntlgD3VGIiwG+xzFdwwkNosptATp0GEjBQhG3jcccGgG9kUhg==?iv=TwMC14xa7Ux9BK6zyu1Cpw==",
    "created_at":1688207242,
    "id":"1220540b6c8f6d5179cafdae93e304a3cc4134a9d958f7c4094dc985347b5a8d",
    "kind":9295,
    "pubkey":"f831caf722214748c72db4829986bd0cbb2bb8b3aeade1c959624a52a9629046",
    "sig":"e3df3184440dcbdb31f9dc13071e59375480f3f744b25586601d8f646edaf66e8f13699e46ae04683e6a6b26ffbf9a392f1cfee352d4cd13dba223650e63ba52",
    "tags":[
        ["e","fe1b6712daabae7157b4948d74c53a01f6186c4ecf0619ea147de85fbed8735a"], // Signer ID
        ["p","3eea9e831fefdaa8df35187a204d82edb589a36b170955ac5ca6b88340befaa0"]
    ]
}
32121 - Label
Required tags
e: event ID of thevaultd: unique ID of thelabelp: public keys of the users involved in thevault
Example
Unencrypted content:
{
    "data":{
        "address":"tb1p..."
    },
    "text":"Label"
}
Event:
{
    "content":"8pIsvOkUvh2necC9kQuRjDMRyDZPDzvigt/cy7RY+690KUwqT/IluT7+yezIO5i2EG9EyizVFGOn35unILaF3tiquGACLvFy39pSwdZCLdNWQcPWFFn/BPLBW/9j9RJy3UqBr9YHdPABDo4nsdd1Ww==?iv=hl9l3SiUiHss58o4oxi8Dg==",
    "created_at":1694864773,
    "id":"1fd6cbd917c1e2ed2b0b3d18755460e49fbdb1ae46301e68c77747bbbf542244",
    "kind":32121,
    "pubkey":"4639e297633117888df17deed6b3860ff152e9e464690623b6b3d6ae4923ad62",
    "sig":"d88ef25b04104a46d2568084fe268a10518fcb8c1c85999d462389f067ac79ccaec285b84cb2600fedfae04650fd12cdbe070f4b167ca7acd0bc86f4ecb83daa",
    "tags":[
        ["p","3eea9e831fefdaa8df35187a204d82edb589a36b170955ac5ca6b88340befaa0"],
        ["p","f831caf722214748c72db4829986bd0cbb2bb8b3aeade1c959624a52a9629046"],
        ["d","1f7db84fdf986cea2fa1d70f2120ad85"], // Unique ID
        ["e","9e0dfd2177ea9357f0c165ed134a86a3c07449676d8315e12d159932ff428e37"] // Policy ID
    ]
}
Rust SDK
This section will show you how to use the Rust SDK.
Installing the library
Add the smartvaults-sdk dependency in your Cargo.toml file:
[dependencies]
smartvaults-sdk = { git = "https://github.com/smartvaults/smartvaults", tag = "vX.X.X" }
Note: you can specify a commit using rev instead of tag.
Examples
Use a specific version:
[dependencies]
smartvaults-sdk = { git = "https://github.com/smartvaults/smartvaults", tag = "v0.3.0" }
Use a specific commit:
[dependencies]
smartvaults-sdk = { git = "https://github.com/smartvaults/smartvaults", rev = "383c186cb1df3ab5906978d6b313aed86d2698b1" }
To use the Kotlin language bindings for smartvaults-sdk in your Android project add the following to your gradle dependencies:
repositories {
    mavenCentral()
}

dependencies {
    implementation("io.smartvaults:smartvaults-sdk:<version>")
}
Import the library in your code:
import io.smartvaults.sdk.*
To import nostr or nostr-sdk:
import rust.nostr.protocol.*
import rust.nostr.sdk.*
Known issues
JNA dependency
Depending on the JVM version you use, you might not have the JNA dependency on your classpath. The exception thrown will be
class file for com.sun.jna.Pointer not found
The solution is to add JNA as a dependency like so:
dependencies {
    // ...
    implementation("net.java.dev.jna:jna:5.12.1")
}
Features
The Rust SDK can be used both in async/await and blocking contexts.
By default, the SDK operate in async mode, so to use it in a blocking context, you have to specify the blocking feature:
[dependencies]
smartvaults-sdk = { ..., features = ["blocking"] }
Constructors
Let's start by constructing the SmartVaults struct.
There are 3 possible constructors: generate, restore and open.
All these when constructed return a ready to use client.
Generate
This constructor generate a random BIP39 mnemonic and store it in a local encrypted keychain.
use smartvaults_sdk::prelude::*;

#[tokio::main]
async fn main() {
let client = SmartVaults::generate(
    "./your-base-path", // A local path where to store all the data
    "account-name", // This will be used for the keychain file name
    || Ok(String::from("password")), // Keychain encryption password
    || Ok(String::from("password")), // Confirmation of the above password
    WordCount::W24, // Number of mnemonic words (possible values are: 12, 18 or 24)
    || Ok(None), // Optional passphrase that will be stored in the keychain
    Network::Testnet, // The bitcoin network to use
)
.await?;
}
import io.smartvaults.sdk.*

// TODO
Restore
This constructor restore a BIP39 mnemonic and store it in a local encrypted keychain.
use smartvaults_sdk::prelude::*;

#[tokio::main]
async fn main() {
let client = SmartVaults::restore(
    "./your-base-path", // A local path where to store all the data
    "account-name", // This will be used for the keychain file name
    || Ok(String::from("password")), // Keychain encryption password
    || Ok(String::from("password")), // Confirmation of the above password
    || Ok(Mnemonic::from_str("your menmonic").unwrap()), // A BIP39 mnemonic
    || Ok(Some(String::from("my-optional-passphrase"))), // Optional passphrase that will be stored in the keychain
    Network::Testnet, // The bitcoin network to use
)
.await?;
}
Open
This constructor open an already existing keychain.
use smartvaults_sdk::prelude::*;

#[tokio::main]
async fn main() {
let client = SmartVaults::open(
    "./your-base-path",
    "account-name",
    || Ok(String::from("password")),
    Network::Testnet,
)
.await?;
}
Configs & Relays
Once the client is constructed, you can start editing the default configs and relays.
Note: both the configs and relays are persistent, so you not need to edit them every time.
View and edit configs
use smartvaults_sdk::prelude::*;

#[tokio::main]
async fn main() {
let client = ...; // The client that you before constructed

// Get the current configs
let config = client.config();

// View the current configs
println!("Current electrum endpoint: {}", config.electrum_endpoint().await?);
println!("Current proxy: {}", config.proxy().await.ok());
println!("Current block explorer: {}", config.block_explorer().await?);

// Edit the electrum endpoint
config.set_electrum_endpoint(Some("tcp://127.0.0.1:50001")).await;

// Edit the block explorer url
let url = Url::parse("http://myblockexplorer.local")?;
config.set_block_explorer(Some(url)).await;

// Save the configs in the persistent file
config.save().await?;
}
View relays
use smartvaults_sdk::prelude::*;

#[tokio::main]
async fn main() {
let client = ...; // The client that you before constructed

for (relay_url, relay) in client.relays().await.into_iter() {
    let stats = relay.stats();
    println!("Url: {relay_url}");
    println!("Status: {}", relay.status().await);
    println!("Attempts: {}", stats.attempts());
    println!("Success: {}", stats.success());
    println!("Bytes sent: {}", stats.bytes_sent());
    println!("Bytes received: {}", stats.bytes_received());
    if let Some(latency) = stats.latency().await {
        println!("Latency: {} ms", latency.as_millis());
    }
}
}
Edit relays
use std::net::{Ipv4Addr, SocketAddr, SocketAddrV4};
use smartvaults_sdk::prelude::*;

#[tokio::main]
async fn main() {
let client = ...; // The client that you before constructed

// Add a relay (without proxy)
client.add_relay("wss://you.relay.com", None).await?;

// Add a relay (with proxy)
let proxy = Some(SocketAddr::V4(SocketAddrV4::new(Ipv4Addr::LOCALHOST, 9050)));
client.add_relay("wss://you.relay2.com", Some(proxy)).await?;

// Remove a relay
client.remove_relay("wss://you.relay.com").await?;
}
Profile & Contacts
Profile
use smartvaults_sdk::prelude::*;

#[tokio::main]
async fn main() {
let client = ...; // The client that you before constructed

// Get your profile (public key and metadata)
let profile: User = client.get_profile().await?;
println!("My public key: {}", profile.public_key());
println!("My name: {}", profile.name());
println!("My metadata: {:#?}", profile.metadata());

// Edit metadata
let metadata = profile.metadata().name("myname").display_name("My Name").nip05("myname@example.com");
client.set_metadata(metadata).await?;
}
Add/Remove contacts
use smartvaults_sdk::prelude::*;

#[tokio::main]
async fn main() {
let client = ...; // The client that you before constructed

// Public key from hex
let public_key = XOnlyPublicKey::from_str("ea527e059759d368a55253270454e58e9d6e4fe2e98d302d6e01821fa973259d")?;
// Public key from bech32
let public_key = XOnlyPublicKey::from_bech32("npub1aff8upvht8fk3f2j2vnsg48936wkunlzaxxnqttwqxppl2tnykwsahwngp")?;

// Add a contact
// This method will automatically request metadata of the contact
client.add_contact(public_key).await?;

// Remove a contact
let another_public_key: XOnlyPublicKey = ...;
client.remove_contact(another_public_key).await?;

// Get contact list
let list: Vec<User> = client.get_contacts().await?;
}
Get metadata of a generic public key
use smartvaults_sdk::prelude::*;

#[tokio::main]
async fn main() {
let client = ...; // The client that you before constructed

let public_key: XOnlyPublicKey = ...;
// This method check if metadata for a public key exists in local database.
// If not exists, will return an empty `Metadata` struct and will request it to relays.
let metadata: Metadata = client.get_public_key_metadata(public_key).await?;
}
Signers
Signers are descriptors that you can share with contacts (or with other users) to simplify the process of policies creation.
The SmartVaults signer
The SmartVaults signer it's derived from your local seed.
It's use the following derivation path: m/86'/<coin>'/784923' (the coin depends on the selected network)
use smartvaults_sdk::prelude::*;

#[tokio::main]
async fn main() {
let client = ...; // The client that you before constructed

// Save the SmartVaults signer (if not exists)
client.save_smartvaults_signer().await?;
}
External signers
You can save external signers (like AirGap devices).
use std::str::FromStr;

use smartvaults_sdk::prelude::*;

#[tokio::main]
async fn main() {
let client = ...; // The client that you before constructed

let fingerprint = Fingerprint::from_str("7356e457")?;
let descriptor: Descriptor<DescriptorPublicKey> = Descriptor::from_str("[7356e457/86'/1'/784923']tpubDCvLwbJPseNux9EtPbrbA2tgDayzptK4HNkky14Cw6msjHuqyZCE88miedZD86TZUb29Rof3sgtREU4wtzofte7QDSWDiw8ZU6ZYHmAxY9d/0/*")?;
let signer = Signer::airgap("Coldcard", "Description", fingerprint, descriptor)?;
client.save_signer(signer).await?;
}
Note: only taproot descriptors are supported
Share a signer
use smartvaults_sdk::prelude::*;

#[tokio::main]
async fn main() {
let client = ...; // The client that you before constructed

// Get my signers
let signers: Vec<GetSigner> = client.get_signers().await?;

// Get the first signer
let signer_id = signers.first().unwrap().signer_id;

// Public key of the user to share the signer
let public_key: XOnlyPublicKey = ...;

// Share
client.share_signer(signer_id, public_key).await?;
}
Policies
In this section we'll see how to create a policy from a template or from a custom descriptor and how to fund it.
Templates
This library provide some templates to simplify the policies creation.
Currently the following templates are available:
- Multisig (M of N)
- Social recovery: 1 spending key and N others with a
relativetimelock (funds can be spent after a sequence of N blocks) - Inheritance: 1 spending key and N others with an
absolutetimelock (funds can be spent after the block or timestamp X) - Hold: 1 spending key and a
relativetimelock
Save a template
use smartvaults_sdk::prelude::*;

#[tokio::main]
async fn main() {
let client = ...; // The client that you before constructed

let public_keys = vec![...]; // Nostr public keys of users involved in the policy
let template = ...; // See below examples
client
    .save_policy_from_template(
        "My Policy", // Name of the policy
        "Policy created from a template", // Description
        template,
        public_keys,
    )
    .await?;
}
Examples
To simplify the code below, I define all the descriptors used here:
#![allow(unused)]
fn main() {
use std::str::FromStr;
use smartvaults_sdk::core::miniscript::DescriptorPublicKey;

let key1 = DescriptorPublicKey::from_str("[7356e457/86'/1'/784923']tpubDCvLwbJPseNux9EtPbrbA2tgDayzptK4HNkky14Cw6msjHuqyZCE88miedZD86TZUb29Rof3sgtREU4wtzofte7QDSWDiw8ZU6ZYHmAxY9d/0/*").unwrap();
let key2 = DescriptorPublicKey::from_str("[4eb5d5a1/86'/1'/784923']tpubDCLskGdzStPPo1auRQygJUfbmLMwujWr7fmekdUMD7gqSpwEcRso4CfiP5GkRqfXFYkfqTujyvuehb7inymMhBJFdbJqFyHsHVRuwLKCSe9/0/*").unwrap();
let key3 = DescriptorPublicKey::from_str("[f3ab64d8/86'/1'/784923']tpubDCh4uyVDVretfgTNkazUarV9ESTh7DJy8yvMSuWn5PQFbTDEsJwHGSBvTrNF92kw3x5ZLFXw91gN5LYtuSCbr1Vo6mzQmD49sF2vGpReZp2/0/*").unwrap();
}
Multisig 1 of 2
Using the key1 and key2 to create a multisig 1 of 2
use std::str::FromStr;
use smartvaults_sdk::prelude::*;

#[tokio::main]
async fn main() {
let template = PolicyTemplate::multisig(1, vec![key1, key2]);
}
Social recovery
Using key1 as spending key and key2 and key3 as recovery keys with a relative timelock of 6 blocks
use smartvaults_sdk::prelude::*;

#[tokio::main]
async fn main() {
let older = Sequence(6); // Relative timelock of 6 blocks
let recovery = RecoveryTemplate::social_recovery(2, vec![key2, key3], older);
let template = PolicyTemplate::recovery(key1, recovery);
}
Inheritance
Using key1 as spending key and key2 and key3 as recovery with an absolute timelock set at block 840000
use smartvaults_sdk::prelude::*;

#[tokio::main]
async fn main() {
let after = AbsoluteLockTime::from_height(840_000)?; // Absolute timelock (funds can be spent after block 840000)
let recovery = RecoveryTemplate::inheritance(2, vec![key2, key3], after);
let template = PolicyTemplate::recovery(key1, recovery);
}
Hold
Using a single key with a relative timelock
use smartvaults_sdk::prelude::*;

#[tokio::main]
async fn main() {
let older = Sequence(10_000);
let template = PolicyTemplate::hold(key1, older);
}
Custom policies
If you need to save more complex policies that are not included in templates, you can use the save_policy method:
use smartvaults_sdk::prelude::*;

#[tokio::main]
async fn main() {
let client = ...; // The client that you before constructed

let public_keys = vec![...]; // Nostr public keys of users involved in the policy
client
    .save_policy(
        "My custom policy", // Name of the policy
        "Custom policy", // Description
        "...", // Miniscript policy or already compiled descriptor
        public_keys,
    )
    .await?;
}
Funding
use smartvaults_sdk::prelude::*;

#[tokio::main]
async fn main() {
let client = ...; // The client that you before constructed

// Get first policy
let policy = client.get_policies().await?.first().unwrap();

// OR

// Get a specific policy by ID
let policy = client.get_policy_by_id(policy_id).await?;

// Get a new address
let GetAddress { address, .. } = client.get_address(policy.policy_id, AddressIndex::New).await?;
println!("Address: {}", address.assume_checked());
}
Proposals
In this section we'll see how to create a spending proposal and how to approve and finalize it.
Spend
Create a new spending proposal
use smartvaults_sdk::prelude::*;

#[tokio::main]
async fn main() {
let client = ...; // The client that you before constructed

let policy_id: EventId = ...; // Get from policies list or pass a specific event ID

// Create a new proposal
let proposal: Proposal = client
    .spend(
        policy_id,
        Address::from_str("mohjSavDdQYHRYXcS3uS6ttaHP8amyvX78")?, // Dastination address
        Amount::Custom(10_934), // Use `Amount::Max` to send all funds
        "Back to the faucet", // Description
        FeeRate::Priority(Priority::Medium), // Use `FeeRate::Rate(1.0)`` to specify the sat/vByte
        None, // Specify the UTXOs to use (optional)
        None, // Specify the policy path to use (needed only if exists a timelock in the policy descriptor)
        false, // Allow usage of UTXOs frozen by others proposals
    )
    .await?;
println!("New proposal: {proposal:#?}");
}
Approvals
Currently you can approve a proposal with the seed stored in the keychain or use an AirGap signer and import
the signed PSBT.
Approve with the seed
use smartvaults_sdk::prelude::*;

#[tokio::main]
async fn main() {
let client = ...; // The client that you before constructed

let proposal_id: EventId = ...; // Id of a proposal
// Ex. let proposal_id: EventId = proposal.proposal_id;

// Approve a proposal with the stored seed
client.approve(proposal_id).await?;
}
Approve with a signed PSBT (AirGap signer)
use std::str::FromStr;
use smartvaults_sdk::core::bitcoin::psbt::PartiallySignedTransaction;

use smartvaults_sdk::prelude::*;

#[tokio::main]
async fn main() {
let client = ...; // The client that you before constructed

let proposal_id: EventId = ...; // Id of a proposal
// Ex. let proposal_id: EventId = proposal.proposal_id;

// Approve a proposal with a PSBT
let signed_psbt = PartiallySignedTransaction::from_str("base64-psbt")?;
client.approve_with_signed_psbt(proposal_id, signed_psbt).await?;
}
Finalization
When the proposal is signed, you can finalize it.
use smartvaults_sdk::prelude::*;

#[tokio::main]
async fn main() {
let client = ...; // The client that you before constructed

let proposal_id: EventId = ...;
let proposal: GetProposal = client.get_proposal_by_id(proposal_id).await?;

// Check if proposal is signed
if proposal.signed {
    // Finalize the proposal and broadcast the TX
    client.finalize(proposal_id).await?;
} else {
    println!("This proposal is not fully signed yet!");
}
}
Connect
In this section we'll see how to connect to a Web App using the NIP46 (Nostr Connect).
Initialize a new session
To initialize a new session, you'll need a nostr connect URI (it's provided from the app you want connect to).
use std::str::FromStr;

use smartvaults_sdk::prelude::*;

#[tokio::main]
async fn main() {
let client = ...; // The client that you before constructed

// Parse URI
let uri = NostrConnectURI::forom_str("nostrconnect://f0d056e4bc98d52d53df73fd2f3dac287b1f5f2d868414172759d663987a95e3?metadata=%7B%22name%22%3A%22Smart%20Vaults%22%2C%22description%22%3A%22Bitcoin%20multi-custody%20signature%20orchestration%22%2C%22url%22%3A%22https%3A%2F%2Fsmartvaults.app%22%2C%22icons%22%3A%5B%22https%3A%2F%2Fsmartvaults.app%2Ffavicon.ico%22%5D%7D&relay=wss%3A%2F%2Ftest.relay.report")?;

// Initialize session
client.new_nostr_connect_session(uri).await?;
}
Get, approve and reject requests
use smartvaults_sdk::prelude::*;

#[tokio::main]
async fn main() {
let client = ...; // The client that you before constructed

// Get pending requests
let approved: bool = false;
let requests: Vec<NostrConnectRequest> = client.get_nostr_connect_requests(approved).await?;

let first_req: NostrConnectRequest = requests.first().unwrap();
let second_req: NostrConnectRequest = requests.get(1).unwrap();

// Approve a request
client.approve_nostr_connect_request(first_req.event_id).await?;

// Reject a request
client.reject_nostr_connect_request(second_req.event_id).await?;
}
Disconnect from a session
use smartvaults_sdk::prelude::*;

#[tokio::main]
async fn main() {
let client = ...; // The client that you before constructed

// Get current sessions
let sessions: Vec<(NostrConnectURI, Timestamp)> = client.get_nostr_connect_sessions().await?;

// Disconnect from all sessions
for (uri, _timestamp) in sessions.into_iter() {
    // Disconnect session from app public key
    client.disconnect_nostr_connect_session(uri.public_key).await?;
}
}
Keychain
This section will show you how to manage the keychain.
Definition
Keychain means a seed plus an optional list of passphrases.
Store
The keychian it's stored in a file called keechain. It's encrypted using AES-256 in CBC mode and XChaCha20Poly1305: XChaCha20Poly1305(AES256CBC(keychain)).
Change password
use smartvaults_sdk::prelude::*;

#[tokio::main]
async fn main() {
let client = ...; // The client that you before constructed

client.change_password(
    || Ok(String::from("current-password")), // Current password
    || Ok(String::from("new-password")), // New password
    || Ok(String::from("new-password")), // Confirmation of new password
)?;
}
Secrets
use smartvaults_sdk::prelude::*;

#[tokio::main]
async fn main() {
let client = ...; // The client that you before constructed

let secp = Secp256k1::new();

let network: Network = client.network();
let keychain: Keychain = client.keychain();
let secrets: Secrets = keychain.secrets(network, &secp)?;

println!("Entropy: {}", secrets.entropy);
println!("Mnemonic: {}", secrets.mnemonic);
if let Some(passphrase) = &secrets.passphrase {
    println!("Passphrase: {}", passphrase);
}
println!("Seed (hex): {}", secrets.seed_hex);
println!("Root Key (BIP32): {}", secrets.root_key);
println!("Fingerprint: {}", secrets.fingerprint);
}
Wipe
Delete the keychain
use smartvaults_sdk::prelude::*;

#[tokio::main]
async fn main() {
let client = ...; // The client that you before constructed

// Delete the keychain
client.wipe("your-password")?;
}
Getting started
Install dependencies
npm install @smontero/smartvaults-js-client @smontero/smartvaults-wasm @smontero/nostr-ual --save
Import modules
import { NostrClient, SmartVaults, Contact, Keys } from '@smontero/smartvaults-js-client';
import { DirectPrivateKeyAuthenticator } from '@smontero/nostr-ual'
import {
  Wallet,
  miniscript_to_descriptor as miniScriptToDescriptor,
  can_finalize_psbt as canFinalizePsbt,
  get_trx_id as getTrxIdWasm,
  get_fee as getFeeWasm,
  MiniscriptBuilder,
  get_psbt_utxos as getPsbtUtxos,
  descriptor_to_miniscript as descriptorToMiniscript
} from '@smontero/smartvaults-wasm'
Initializing SmartVaults
Parameters for Initialization
authenticator: An instance of an AuthenticatorbitcoinUtil: Utility functions related to Bitcoin transactionsnostrClient: An instance of NostrClient for interacting with Nostr relays
// Define the authenticator
const myKeys = new Keys()
const authenticator = new DirectPrivateKeyAuthenticator(myKeys.privateKey)

// Define the bitcoin utility functions
const ENDPONIT = 'https://mempool.space/testnet/api'
const NETWORK = 'testnet'
const STOP_GAP = 20 // Stop searching addreses for transactions after this number of consecutive addresses with no transactions is found
const bitcoinUtil = {
        walletSyncTimeGap: 3, // Minutes that have to pass after the last sync, to require another sync when performing an operation
        toDescriptor: miniScriptToDescriptor,
        createWallet: (descriptor) => {
          return new Wallet(
            descriptor,
            ENDPONIT,
            NETWORK,
            STOP_GAP
          )
        },
        canFinalizePsbt: (psbts) => canFinalizePsbt(psbts),
        getTrxId: (trx) => getTrxIdWasm(trx),
        getFee: (psbt) => getFeeWasm(psbt),
        getPsbtUtxos: (psbt) => getPsbtUtxos(psbt),
        toMiniscript: (descriptor) => descriptorToMiniscript(descriptor)
}

// Define the Nostr client
const nostrClient = new NostrClient(['wss://test.relay.report'])

// Initialize SmartVaults
const smartVaults = new SmartVaults ({authenticator, bitcoinUtil, nostrClient})
Set profile and Contacts
In this section we show how to manage user profiles and contacts.
Table of Contents
- Setting up Metadata and User Profiles
- Retrieving the User Profile
- Creating a New Contact
- Adding or Updating a Contact
- Fetching Contacts
- Fetching Contacts with Metadata
- Fetching Recommended Contacts
- Removing a Contact
Setting up Metadata and User Profiles
To set up a user profile, you need to use the setProfile method. Create a metadata object to include the details you wish to set in the profile.
const metadata = { name: 'Bob', about: 'Learning about Smart Vaults!' };
await smartVaults.setProfile(metadata);
Retrieving the User Profile
To fetch a profile, use the getProfile method.
const myPublicKey = authenticator.getPublicKey();
const myProfile = await smartVaults.getProfile(myPublicKey);
Creating a New Contact
To create a new contact, let's first generate a new set of Keys.
const contactKeys = new Keys();
const contactAuthenticator = new DirectPrivateKeyAuthenticator(contactKeys.privateKey);
const contactPubKey = contactAuthenticator.getPublicKey();
Creating and adding a contact
The upsertContacts method allows you add a new contact.
const contact = new Contact({ publicKey: contactPubKey });
await smartVaults.upsertContacts(contact);
Fetching Contacts
You can fetch your existing contacts using the getContacts method.
const contacts = await smartVaults.getContacts();
Fetching Contacts along with their metadata
To fetch contacts along with their profile metadata, you can use the getContactProfiles method.
const contactsProfiles = await smartVaults.getContactProfiles();
Fetching Recommended Contacts
When 'user A' adds 'user B' as a contact, 'user A' is automatically added as a recommended contact for 'user B'. To fetch recommended contacts, use the getRecommendedContacts method.
const recommendedContacts = await smartVaults.getRecommendedContacts();
Removing a Contact
To remove a contact, use the removeContacts method.
await smartVaults.removeContacts(contactPubKey);
Signers
This guide walks you through the process of fetching your owned signers and sharing them with your contacts.
Table of Contents
- Fetching Owned Signers
- Sharing an Owned Signer with a Contact
Fetching Owned Signers
To get the list of signers that you own, you can use the getOwnedSigners method.
const mySigners = await smartVaults.getOwnedSigners();
const mySigner = mySigners[0]; // For this example, we are assuming that you have at least one signer
Sharing an Owned Signer with a Contact
To share a signer with a contact, use the saveSharedSigner method. The method takes two parameters: the ownedSigner you wish to share and the public keys of the contacts (pubKeys).
const pubKeys = [contactPubKey]; // Replace with the actual public keys of the contacts you wish to share the signer with
const sharedSigners = await smartVaults.saveSharedSigner(mySigner, pubKeys);
Vaults
There cannot be Smart Vaults without Vaults. In this section, we will learn how to create and manage vaults. We start with some definitions.
- Vault is a Bitcoin Wallet.
- Policy is a set of rules that define how a vault can be managed.
- Vault Template is Vault with a predefined Policy.
While it is true that a Policy is not exactly the same as a descriptor, we define the Policy event as a Nostr event with kind 9289 that (in its encryped content) contains a descriptor.
Creating a Vault
In this example, we will create a 2-of-2 multisig vault, but as you will see, the process is similar for other types of vaults.
Fetching the Signer's Key
To create a vault we need keys, once you have fetched your signers, get the key for the signer you wish to use.
const mySignerKey = mySigner.key;
Getting the Co-Signer's Key
Retrieve the key of a co-signer to include in the multisig vault.
const coSigner = await smartVaults.getSharedSigners();
const coSignerKey = coSigner[0].key;
Setting the Threshold and Creating Miniscript
Create a miniscript that specifies the threshold and keys for the 2-of-2 multisig.
const threshold = 2;
const keys = [mySignerKey, coSignerKey];
const miniscript = MiniscriptBuilder.multisig({threshold, keys});
Defining Additional Parameters
Define other necessary parameters, like the name and description of the vault, and the public keys of vault participants.
const name = 'My First Vault';
const description = "2 of 2 Multisig";
const nostrPublicKeys = [myPublicKey, contactPubKey];
Creating the Vault
Finally, create the vault by invoking the savePolicy method.
await smartVaults.savePolicy({ name, description, miniscript, nostrPublicKeys });
Notice that the only assumption the savePolicy methods makes about the miniscript is that it is a valid miniscript. This means that you can use any miniscript you want, the Smart Vaults Web app offers a few templates to make it easier to create common types of vaults, but also allows you to create custom vaults.
Basic Fetching of Vaults
To fetch vaults without any specific pagination, you can simply call the getPolicies method without any arguments.
const policies = await smartVaults.getPolicies();
This will return an array of PublishedPolicy objects.
Deleting a Vault
To delete a vault, you can use the deletePolicy method.
await smartVaults.deletePolicies(policyId);
We will explore the vault methods in more detail in the next section.
Creating Proposals
Overview
The spend method is used to create a spending proposal, first, let's look at the method definition.
Method Signature
spend(payload: SpendProposalPayload): Promise<PublishedSpendingProposal>
Parameters
payload: SpendProposalPayload
The payload for the spending proposal.
policy: PublishedPolicy object.to_address: The recipient's address.description: Description of the proposal.amountDescriptor: Amount to be spent.feeRatePriority: Fee rate priority (e.g., 'low', 'medium', 'high').policyPath: Policy path.utxos: List of unspent transaction outputs (UTXOs) to be used. (Optional)useFrozenUtxos: Flag to specify whether frozen UTXOs can be used. (Optional)
Returns
Promise<PublishedSpendingProposal>
A Promise that resolves to a PublishedSpendingProposal object representing the published spending proposal.
Errors
The method may throw various errors under certain conditions:
- Invalid UTXOs: If the provided UTXOs are invalid.
- Frozen UTXOs Without Flag: If frozen UTXOs are provided but
useFrozenUtxosis not set totrue. - Transaction Building Error: If an error occurs while building the transaction.
- Publishing Error: If an error occurs while publishing the proposal.
Example Usage
Here's an example code snippet that demonstrates how to use the spend method to create a spending proposal:
const payload = {
  policy: somePublishedPolicyObject,
  to_address: "abc123",
  description: "A spending proposal",
  amountDescriptor: 10,
  feeRatePriority: 'high',
  policyPath: new Map([['nodeId',[0,1,2]]]) // Optional but needed if the policy descriptor has more than one path,
  utxos: ["utxo1", "utxo2"], // Optional
  useFrozenUtxos: false // Optional
};

const spendingProposal = await spend(payload);
Fetching Proposals
Overview
The Smart Vaults JS library provides multiple methods for fetching proposals.
Available Methods for Fetching Proposals
1. getProposals()
This method fetches all proposals without any filters.
const proposals = await smartVaults.getProposals();
Of course, you can also use it with pagination options.
const newProposals = await smartVaults.getProposals({since: someRecentDate });
2. getProposalsById(proposalIds: Array)
Fetches proposals based on their IDs.
const specificProposals = await smartVaults.getProposalsById([someProposalId, anotherProposalId]);
3. getProposalsByPolicyId(policyIds: Array)
Fetches proposals based on their associated policy IDs.
const policyBasedProposals = await smartVaults.getProposalsByPolicyId([somePolicyId, anotherPolicyId]);
Approvals
We define an Approval as a Nostr event with kind 9291, that (in its encryped content) contains a signed PSBT. Currently, an approval can be created in two ways:
- Using the Smart Vaults desktop app.
- Using the Smart Vaults iOs app.
Approvals and signers
An approval can only be created using a valid signer. The valid signers are defined in the policy of the vault from which the proposal was created.
Approvals and proposals
An approval is always associated with a proposal. The proposal can only be finalized when all the required approvals are created.
Fetching approvals
To fecth approvals, you can use the 'getApprovals' method.
const approvals = await smartVaults.getApprovals();
This method retrives all the approvals that you or the members your vaults have created.
Fetching approvals associated with a proposal
In practice, you will want to fetch the approvals associated with a given proposal. To do so, you can use the 'getApprovalsByProposalId' method.
const approvals = await smartVaults.getApprovalsByProposalId(proposalId);
Approvals and proposal status
When you fetch a proposal, you can see the status of the proposal. The status can be one of the following:
- 'Unsigned': The proposal has not been signed by all the required signers.
- 'Signed': The proposal has been signed by all the required signers.
Completed proposals
We define a 'Completed Proposal' as a Nostr event with Kind '9292' that (in its encryped content) contains a Bitcoin transaction. A completed proposal can only be created when the proposal has been approved (signed) by all the participants.
Creating a Completed Proposal
To create a Completed Proposal, we use the 'finalizeSpendingProposal' method.
const completedProposal = await smartVaults.finalizeSpendingProposal(proposalId);
The completedProposal object contains the transaction ID of the Bitcoin transaction that was broadcasted. When the Completed Proposal is created, the associated Proposal is automatically deleted. If you decided to use frozen UXTOS, the proposals that share the same UTXOs will also be deleted.
Introducción a Miniscript
Introducción
En este artículo hablaremos sobre Miniscript, intentado cubrir las ideas principales, las cuales creemos de interés para cualquier persona que esté interesada en empezar a usar esta poderosa herramienta.
La mejor forma de introducirse a una tecnología nueva es, como sabemos, leyendo su documentación, la documentación más completa sin duda es la que podemos encontrar en: https://bitcoin.sipa.be/miniscript/ , escrita por Pieter Wuille, uno de los creadores de Miniscript, en ella encontramos la definición que utilizaremos en este artículo:
Cuya traducción literal al español es:
Por lo tanto Miniscript es:
Primero, comenzaremos comentando sobre algunos de los conceptos que aparecen en la definición.
Bitcoin Script
Si una divisa ha de ser de alguna utilidad, sin duda es necesario que esta pueda ser transferida.
Por lo tanto es necesario definir un mecanismo que permita tal transferencia. Adicionalmente, tal mecanismo debe poder asegurar el cumplimiento de ciertas condiciones, por ejemplo, que la persona que transfiere la divisa tenga el derecho de hacerlo.
En el caso de Bitcoin, el lenguaje que permite definir (y comprobar) estas condiciones se conoce como Bitcoin Script.
Bitcoin Script es un lenguaje de programación relativamente simple, pero que, como veremos, puede ser difícil de usar.
En las siguientes secciones, siempre que utilzemos la palabra script nos referiremos a un Bitcoin Script.
Estructura
Todo lenguaje implica estructura, la estructura de miniscript, nos dice la definición, habilita entre otras cosas:
- Análisis
- Composición
Análisis
El análisis es uno de esos conceptos que cuya definición es más clara cuando se le asigna un apellido.
Algunos de los análisis que Miniscript facilita son:
- Análisis de condiciones de gasto: ¿Cuáles son las condiciones de gasto de un script?
- Análisis de seguridad: ¿Es posible que un script sea maleable?
- Análisis de costos: ¿Cuál será el costo de usar un script?
Composición
La composición es el acto de juntar dos o más cosas para formar una nueva.
En el caso de Miniscript, la composición se refiere a la habilidad de juntar dos o más fragmentos (scripts) para formar uno nuevo.
Subconjunto
Para bien o para mal la palabra subconjunto trae consigo una connotación intuitiva, y como toda intuición, no siempre está en lo correcto, un ejemplo bastará:
Mientras que es cierto que el conjunto de los líquidos tiene mucho más que ofrecer que solo agua, es fácil ver porque en nuestro dia a dia nos interesa solo un subconjunto en particular.
Lo mismo es cierto en el caso de Miniscript: el subconjunto que se selecciona es tal que nos permite trabajar con Bitcoin Script sin preocuparnos de, por accidente o intención, "consumir líquidos nocivos para la salud".
Aunque el comentario anterior puede parecer trivial, en realidad, encapsula la motivación principal para usar miniscript:
En particular, con Bitcoin Script es difícil realizar los análisis mencionados en la sección anterior, a decir:
- Determinar si un script es correcto.
- Determinar si un script es seguro (i.e no es propenso a ser maleable).
- Estimar fees (i.e tamaño de una transacción en el peor de los casos)
Antes de continuar nuestra discusión, conviene introducir la siguiente definición:
Condición de gasto: es el conjunto de condiciones mínimas que, al cumplirse, permiten usar con éxito un UTXO en una transacción
Por ejemplo:
- La condición (única) de gasto de una wallet single-sig es la firma del dueño de dicha wallet.
- La condición (uńica) de gasto de una wallet musltisg 2 de 2, es la firma de las dos llaves involucradas.
- Una (de dos en total) condición de gasto de una wallet multisig 1 de 2, es la firma de una de las llaves involucradas
Mientras que algunos de los puntos, como el de seguridad, pueden (y muchas veces son) minimizados por restricciones a nivel de policy, Miniscript soluciona un problema más general:
La respuesta es, para la mayoría de nosotros: No.
Para convencernos, veamos el siguiente ejemplo:
Miniscript Policy (A):
Bitcoin Script (B):
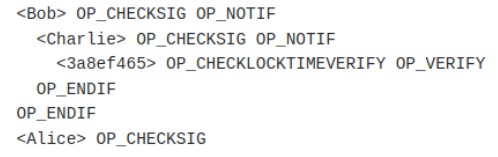
Invitamos al lector a analizar por un momento la expresión (A).
Asumiendo que una condición es de gasto, en el contexto de Miniscript, si toda la expresión, evaluada lógicamente, toma el valor de verdadero, debe resultar fácil convencerse de que las condiciones de gasto son:
- Firma de Alice y Firma Bob
- Firma de Alice y Firma Charlie
- Firma de Alice y el tiempo especificado (1710526010 unix time) ha transcurrido.
Si las condiciones de gasto que mencionamos son ciertas, se sigue que:
-
Los operadores and y or tienen un comportamiento similar al de sus homónimos lógicos (en caso de duda consulte las tablas de verdad para conjunciones y disyunciones)
-
Cada uno de sus elementos debe poder ser evaluado a un booleano (verdadero o falso)
Sería incorrecto afirmar que las expresiones (A) Y (B) son equivalentes (recordemos nuestra breve digresión sobre subconjuntos), pero las condiciones de gasto expresadas en miniscript se conservan al pasar (con la ayuda de un compilador) de (A) a (B).
¿Dos Miniscripts?
Probablemente el lector habrá notado que en la sección anterior nos hemos referido a la expresión (A) como Miniscript Policy y no como Miniscript.
La razón es que son dos lenguajes diferentes.
La siguiente expresión (C):
Es el Miniscript que el Miniscript Policy (A) genera.
Examinemos de nuevo (A):
Notemos que las expresiones son muy similares, solo se eliminan algunas cosas de (A), como ese extraño ‘9@’ (del que hablaremos en la siguiente sección), se agregan otras como el ‘v:’ y a los ‘and’ y ‘or’ se les agrega un par de caracteres (en realidad son tipos y modificadores).
Mientras que no entraremos a detalles sobre lo que significa cada uno de los cambios que ocurren cuando se pasa de (A) a (C), vale la pena mencionar cómo ocurre esta transformación:
El Miniscript (C) se obtiene al compilar el Miniscript Policy (A)
Naturalmente, el lector puede pensar que la razón de existir estos dos lenguajes es solo para evitarnos el trabajo de agregar todos esos caracteres (aparentemente necesarios) que aparecen en (A), la razón resulta ser más fundamental:
Para ilustrar el problema, consideremos una condición de gasto simple:
Podemos decir que existen al menos cuatro formas (opcodes) de comprobar esta condición:
- OP_CHECKSIG
- OP_CHECKSIGVERIFY
- OP_CHECKMULTISIG
- OP_CHECKMULTISIGVERIFY
En realidad basta con darnos cuenta que existen muchas formas de combinar los operadores 'and' y 'or' para expresar una condición dada.
Si hay varias opciones disponibles, tenemos la libertad de elegir ciertos parámetros de intéres para facilitar la elección, uno de ellos, del que hablaremos a continuación es:
Probabilidades y Optimización
Anteriormente mencionamos que para determinar las condiciones de gasto es útil pensar en que todos los elementos dentro de los operadores and y or deben poder ser evaluados a un booleano. Si asumimos que pk(A) es verdadero cuando se cuenta con una firma válida de A y falso cuando no, surge la pregunta:
¿Qué significa ‘N@pk(A)’ donde N es un número entero?
Empezaremos aclarando que ‘N@’ NO es un operador sobre el booleano pk(A):
N@pk(A) es verdadero si pk(A) es verdadero y falso si pk(A) es falso, sin importar el valor de N.
‘N@pk(A)’ es la notación para asignar a pk(A) una probabilidad relativa respecto a las otras condiciones que aparecen dentro de un mismo ‘or’.
Por lo tanto en la expresión (A), la presencia de ‘9@pk(Charlie)’ es para comunicarle al compilador, que la condición ‘pk(Charlie)’ es 9 veces más probable que la condición ‘after(1710526010)’.
Pero, ¿de qué sirve asignar probabilidades?
Como mencionamos en la sección anterior, dado un conjunto de posibles elecciones, nos conviene escoger aquella que, entre otras cosas, sea óptima.
Decimos que una elección es óptima si, al incluirla, el tamaño del Script resultante es el menor.
Al asignar probabilidades podemos comunicarle al compilador que una rama es más probable (o no) que las otras, en otras palabras, le decimos que le dé prioridad a optimizar ( reducir el tamaño) de la rama que es más probable, a costa de posiblemente incrementar el de la menor probabilidad.
Conclusión
En este artículo hemos hablado un poco sobre la motivación para usar miniscript, así como de algunas de sus ideas principales, invitamos al lector a leer la documentación oficial si le interesa una introducción con mayor detalle.
En siguientes publicaciones hablaremos sobre Taproot y cómo se puede usar en conjunto con Miniscript.
Autor:
Armando Medina
Introduction to Miniscript
Introduction
In this article, we will discuss Miniscript, aiming to cover the main ideas, which we believe are of interest to anyone looking to start using this powerful tool.
The best way to get introduced to a new technology is, as we know, by reading its documentation. The most comprehensive documentation can be found at: https://bitcoin.sipa.be/miniscript/, written by Pieter Wuille, one of the creators of Miniscript. There, we find the definition that we will use in this article:
Therefore, according to the definition, Miniscript is:
First, we will begin by discussing some of the concepts that appear in the definition.
Bitcoin Script
If a currency is to be of any use, it is necessary for it to be transferable.
Therefore, it is necessary to define a mechanism that allows such transfer. Additionally, such a mechanism must be able to ensure the fulfillment of certain conditions, for example, that the person transferring the currency has the right to do so.
In the case of Bitcoin, the language that allows defining (and checking) these conditions is known as Bitcoin Script.
Bitcoin Script is a relatively simple programming language but, as we will see, can be difficult to use in practice.
In the following sections, whenever we use the word script, we will be referring to a Bitcoin Script.
Structure
Every language implies structure, and the structure of Miniscript, as the definition tells us, enables among other things:
- Analysis
- Composition
Analysis
Analysis is the act of examining something in detail, in this case, a script.
Some of the analyses that Miniscript facilitates are:
- Analysis of spending conditions: What are the spending conditions of a script?
- Security analysis: Is it possible for a script to be malleable?
- Cost analysis: What will be the cost of using a script?
Composition
Composition is the act of joining two or more things to form a new one.
In the case of Miniscript, composition refers to the ability to join two or more fragments (scripts) to form a new one.
Subset
For better or worse, the word subset brings with it an intuitive connotation, and like all intuition, it is not always correct. One example will suffice:
While it is true that the set of liquids has much more to offer than just water, it's easy to see why, in our daily lives, we are only interested in a particular subset.
The same is true in the case of Miniscript: the selected subset is such that it allows us to work with Bitcoin Script without having to worry too much about some of its complexities.
Although the above comment may seem trivial, it actually encapsulates the main motivation for using Miniscript:
In particular, with Bitcoin Script, it is difficult to perform the analyses mentioned in the previous section, namely:
- Determine if a script is correct.
- Determine if a script is safe (not prone to being malleable).
- Estimate fees (the size of a transaction in the worst case).
Before we continue our discussion, it is useful to introduce the following definition:
Spending condition: is the set of minimum conditions that, when met, allow a UTXO to be successfully used in a transaction.
For example:
- The (single) spending condition of a single-sig wallet is the owner's signature.
- The (single) spending condition of a 2 of 2 multisig wallet is the signature of the two keys involved.
- One (of two total) spending condition of a 1 of 2 multisig wallet is the signature of one of the keys involved.
While some points, like security, can (and often are) minimized by policy-level restrictions, Miniscript also solves another problem:
The answer is, for most of us: No.
To convince ourselves, let's look at the following example:
Miniscript Policy (A):
Bitcoin Script (B):
We invite the reader to analyze expression (A) for a moment.
Assuming that a condition is a spending condition, in the context of Miniscript, if the entire expression, when logically evaluated, becomes true, it should be easy to convince oneself that the spending conditions are:
- Alice's signature and Bob's signature
- Alice's signature and Charlie's signature
- Alice's signature and the specified time (1710526010 unix time) has elapsed.
If the spending conditions mentioned above are true, it follows that:
-
The and and or operators behave similarly to their logical counterparts (when in doubt, consult the truth tables for conjunctions and disjunctions).
-
Each of its elements must be able to be evaluated to a boolean (true or false).
It would be incorrect to claim that expressions (A) and (B) are equivalent (remember our brief digression on subsets), but the spending conditions expressed in Miniscript are preserved when transitioning (with the help of a compiler) from (A) to (B).
Two Miniscripts?
The reader may have noticed that in the previous section we referred to expression (A) as Miniscript Policy and not as Miniscript.
The reason is that they are two different languages.
The following expression (C):
Is the Miniscript generated by the Miniscript Policy (A).
Let's examine (A) again:
Notice that the expressions are very similar, only some things are removed from (A), like that strange ‘9@’ (which we will talk about in the next section), others are added like the ‘v:’, and to the ‘and’ and ‘or’ a couple of characters are added (in reality, these are types and modifiers).
While we will not go into details about what each of the changes that occur when going from (A) to (C) means, it is worth mentioning how this transformation occurs:
The Miniscript (C) is obtained by compiling the Miniscript Policy (A).
Naturally, the reader might think that the reason for these two languages to exist is only to save us the work of adding all those characters (apparently necessary) that appear in (A), but the reason turns out to be more fundamental:
To illustrate the problem, let's take a simple spending condition.
pk(A) is true if there is a valid signature from A and false otherwise.
In principle there are at least four ways (opcodes) to check this condition:
- OP_CHECKSIG
- OP_CHECKSIGVERIFY
- OP_CHECKMULTISIG
- OP_CHECKMULTISIGVERIFY
In fact, it is enough to realize that there are many ways to combine the 'and' and 'or' operators to express a given condition.
If there are several options available, we have the freedom to choose certain parameters of interest to facilitate the choice, one of them, which we will discuss next, is:
Probabilities and Optimization
Previously we mentioned that to determine the spending conditions it is useful to think that all the elements within the 'and' and 'or' operators must be able to be evaluated to a boolean. If we assume that pk(A) is true when there is a valid signature from A and false otherwise, the question arises:
What does ‘N@pk(A)’ mean where N is an integer?
Let's start by clarifying that ‘N@’ is NOT an operator on the boolean pk(A):
N@pk(A) is true if pk(A) is true and false if pk(A) is false, regardless of the value of N.
‘N@pk(A)’ is the notation for assigning pk(A) a relative probability compared to the other conditions that appear within the same ‘or’.
Therefore, in expression (A), the presence of ‘9@pk(Charlie)’ is to communicate to the compiler that the condition ‘pk(Charlie)’ is 9 times more likely than the condition 'after(1710526010)'.
But, what is the purpose of assigning probabilities?
As mentioned in the previous section, given a set of possible choices, it is to our advantage to choose the one that, among other things, is optimal.
We say a choice is optimal if, by including it, the resulting script's size is the smallest.
By assigning probabilities, we can communicate to the compiler that one branch is more likely (or not) than the others; in other words, we tell it to prioritize optimizing (reducing the size) of the more likely branch, at the expense of possibly increasing the size of the less probable one.
Conclusion
In this article, we have talked a bit about the motivation to use Miniscript, as well as some of its main ideas. We invite the reader to read the official documentation if interested in a more in depth discussion.
In subsequent publications, we will discuss Taproot and how it can be used in conjunction with Miniscript.
Author:
Armando Medina
Social Recovery: Do you want to self-custody your bitcoin but are afraid of losing access to it?
Introduction
Bitcoin custody comes with its own set of challenges and risks, regardless of whether you choose self-custody or third-party custodians. While third-party custodians can alleviate some burdens, the risks of hacking, mismanagement, or insolvency can be more likely and potentially lead to the loss of your Bitcoin. Smart Vaults offers a self-custody solution that focuses on mitigating these risks and providing you with full control over your Bitcoin.
Self-custody of Bitcoin involves storing your digital assets in a wallet that only you have access to. This means that you are solely responsible for safeguarding the private keys that unlock your wallet. While this level of control offers autonomy, privacy, and direct ownership, it also introduces the "key management problem." If you lose these keys, you lose access to your Bitcoin, and there's no central authority or customer service to help you recover it.
Smart Vaults is an easy-to-use and powerful open-source Bitcoin application designed to guide you through the process of creating and managing secure vaults for your Bitcoin. The app offers various vault templates tailored to different use cases, but for those worried about losing access to their Bitcoin, the Social Recovery Template stands out as a self-custody solution.
It's worth noting that the "Social" part of the Social Recovery Template can be as social as you want it to be. The recovery keys you define can belong to any person you want, including yourself.
The Social Recovery Template is a self-custody solution that helps you ensure you never lose control of your Bitcoin. With this vault template, you can:
- Define any number of recovery keys.
- Specify the time that needs to elapse before the signatures of those keys become valid.
- Specify the number of recovery signatures needed for recovery.
So, in the unfortunate but possible scenario where you lose access to your keys, the recovery cosigners you defined when creating the vault can help you recover your Bitcoin after the specified period of time has passed.
The Social Recovery Vault mitigates the key management problem by distributing the responsibility of key safekeeping among trusted individuals. These guardians do not have any control over your Bitcoin before the specified time has elapsed, and even after the time has passed, any transaction will need to have the required number of signatures you defined. This way, you maintain full control over your assets while having a safety net in case of key loss or technical errors.
In conclusion, Smart Vaults' Social Recovery vault is a self-custody solution designed for those who want to enjoy the benefits of autonomy, privacy, and direct ownership without constantly worrying about losing their keys or encountering technical issues. By choosing Smart Vaults, you prioritize self-custody above anything else, effectively managing the associated risks while maintaining full control over your Bitcoin.
With Smart Vaults, you can step into the world of Bitcoin self-custody with confidence.
Creating your first Social Recovery Vault
In the following guide, we will assume you have already installed the Smart Vaults iOS app, created an account and added some contacts. If you haven't done so yet, you can find the (beta) app on TestFlight.
for a step-by-step guide on how to add contacts and share signers, you can watch the following video:
To create a Social Recovery Vault on the Smart Vaults iOS app, follow these steps:
-
Navigate to the Vaults tab by clicking the plus icon located on the right upper corner of your screen.
-
Select the Social Recovery Template.
-
Define the name and description for your vault and choose the signer you wish to use (if you have more than one).
-
Define the recovery keys and the time that needs to elapse before the signatures of those keys become valid.
-
Define the number of recovery signatures needed for recovery (threshold), finally create the vault.
-
Congratulations! You have successfully created your first Social Recovery Vault.
Inheritance: What will happen to your bitcoin when you are gone?
Introduction
You've worked hard to build your wealth in bitcoin. But have you thought about what will happen to your digital assets when you're no longer around? It's essential to create a plan to ensure your loved ones can access and benefit from your bitcoin inheritance. In this article, we'll discuss the importance of planning for your bitcoin's future, the challenges you might face, and the solution Smart Vaults offers.
Why You Need a Plan for Your Bitcoin Inheritance:
Bitcoin doesn't have a central authority or intermediary to help transfer ownership when someone passes away. That's why it's up to you to make a plan for your loved ones to access your digital wealth. A well-thought-out plan can prevent confusion and make sure your bitcoin goes to the right people. Without one, your digital assets could become inaccessible, and your beneficiaries might miss out on the value you've built.
Leaving bitcoin to your loved ones can be tricky due to its unique features. Here are some issues you might encounter:
-
Understanding Instructions: Bitcoin can be complex, and your beneficiaries might not be familiar with how it works. Without clear instructions, they might struggle to access and manage your digital assets.
-
Keeping Instructions Safe: It's crucial to protect your bitcoin inheritance from unauthorized access. If your instructions fall into the wrong hands, your digital assets could be at risk of theft or misuse.
The Solution: Smart Vault's Inheritance Vault
At Smart Vaults we offer you a solution to these challenges. Our Inheritance vault uses Miniscript to create a secure inheritance logic for your bitcoin holdings.
By using Smart Vault's Inheritance template, you can set up a secure inheritance plan that ensures your loved ones can access your bitcoin only after a predetermined period. This approach simplifies the process, provides clear instructions, and adds an extra layer of security to protect your digital assets from unauthorized access.
Planning for the future of your bitcoin is essential to ensure your loved ones can benefit from your digital legacy. By creating a clear plan and with Smart Vault's Inheritance vault, you can make it easier and safer for your beneficiaries to access and manage your digital wealth. Don't let your hard-earned bitcoin go to waste – start planning today and secure your bitcoin inheritance with Smart Vaults.
Creating your first Inheritance Vault
In the following guide, we will assume you have already installed the Smart Vaults iOS app, created an account and added some contacts. If you haven't done so yet, you can find the (beta) app on TestFlight.
for a step-by-step guide on how to add contacts and share signers, you can watch the following video:
To create a Inheritance vault using the Smart Vaults iOS app, follow these steps:
-
Navigate to the Vaults tab by clicking the plus icon located on the right upper corner of your screen.
-
Select the Inheritance Template.
-
Define the name and description for your vault and choose the signer you wish to use (if you have more than one).
-
Define the inheritance keys and the date in which the signatures of those keys become valid.
-
Define the number of inheritance signatures needed to move or make use of the bitcoin (threshold), finally create the vault.
-
Congratulations! You have successfully created your first Inheritance vault.
Advanced Features
At Smart Vaults, we understand that planning for your bitcoin inheritance is a complex process and that you might have specific requirements. That's why we offer advanced features such as our policy vault editor, which allows you to create custom policies tailored to your needs.
As an advanced user, you can define complex rules and conditions for your bitcoin inheritance, ensuring that your digital assets are managed according to your wishes. With Smart Vaults, you have the flexibility to create a personalized inheritance plan that meets your unique requirements.
In the following example, we'll show you how to create a custom policy for your Inheritance vault.
Let's suppose you want to move all your bitcoin to your inheritance vault to ensure your loved ones can recover it after a specific period if something happens to you, but you also plan to move small amounts of bitcoin for daily expenses. To achieve this, a vault created using the Inheritance template could be enough, but it won't be the most efficient solution. To understand why, we encourage you to read our article on Miniscript, but to summarize, the Inheritance template doesn't make any assumptions about the probability of each spending condition. In our case, we know that the probability of moving small amounts of bitcoin for daily expenses is much higher than the probability of using the inheritance keys after the specified date, so we can optimize the vault to reduce the cost of using it for daily transactions, so let's do that.
To create a custom policy for your Inheritance vault, follow these steps:
-
Navigate to the Smart Vaults Testnet or Mainnet Web App.
-
Click on the New Vault button located on the right upper corner of your screen. At the bottom of the vault templates list, you'll find the Custom Vault option. Click on it.
-
Load the signers you want to use in your vault. In this case, we'll use the same signers we used in the Inheritance vault.
-
Drag and drop the signers and the timelock to the policy editor.
-
Define the spending conditions for your vault. In this case, we'll create two spending paths: Alice's signature (this will be the more likely path) and the inheritance path, notice that we define the former path as 100 times more likely than the later.
-
Choose a name and description for your vault and click on the save button.
-
Congratulations! You have successfully created a custom Inheritance vault.
This is just one example of how you can use Smart Vaults' advanced features to create a custom policy for your bitcoin inheritance. With our flexible tools, you can design a personalized inheritance plan that meets your unique requirements and ensures your digital assets are managed according to your wishes.